Showing posts with label easy cleanup. Show all posts

Sunday, August 4, 2013

Sour Cream and Onion Dip

This one comes directly out of Cooking Light’s August 2013 issue.  It was quite delightful and smooth. I dipped carrots, celery, lentil chips, and orange bell pepper.  The carrots and lentil chips were my favorite options. The dip was really delightful and extremely fast and easy to make. I highly recommend it for casual parties.

I did make some tweaks, though since the recipe originally called for canola oil (mmm..healthy…NOT) and canola mayonnaise.  See below:

1 teaspoon olive oil
2 cups finely chopped sweet yellow onion (it took me 2 onions to reach this- one large and one small)
1 tablespoon minced fresh garlic
¼ teaspoon salt, divided
1 cup reduced fat sour cream
½ cup safflower mayonnaise
2 tablespoons minced fresh chives, divided
¼ teaspoon ground black pepper (they originally used white, though)

Heat a small skillet over medium-high heat. Add oil to pan; swirl to coat. Add onion, garlic, and 1/8 teaspoon salt; cook 4 minutes, stirring frequently. Reduce heat to medium-low; cook 6 minutes, stirring frequently. Cool onion mixture slightly.

Combine sour cream, mayonnaise, 1 ½ tablespoons chives, pepper, and remaining 1/8 teaspoon salt in a large bowl. Add onion mixture; stir well. Top with remaining 1 ½ teaspoons chives.

Serves 12


Enjoy!

Wednesday, November 17, 2010

Recipe: Chocolate Truffles


Now these were good, and very easy to make!

Cooking grade: A-

They were very simple to make. However, you do have to leave these in the refrigerator for 6-8 hours at least. I left them in for almost 24. Also, when you are rolling them into balls, they can get a little messy. I had to constantly wash my hands and wash the little scoop I was using since the chocolate was constantly sticking and it would melt easily in my hands so I couldn't form a ball. Other than that, though, I thought they were pretty fun to make. Also, I think they have a lot of potential with the coatings. It just depends on how much time you are willing to put into them.

Taste grade: B+

I give them a B+ because I didn't quite find a coating that I was completely satisfied with. I tried the unsweetened cocoa. Poor choice. The bitterness dries out your mouth. I tried the crushed hazelnuts. This was the best combination, in my opinion. I also tried confectioners' sugar. I haven't quite tried these yet, but I guarantee you I will be.

These are so rich and creamy. The semi-sweet chocolate makes the truffles taste so rich. I think the best part about these is that I actually want to eat these.


I would definitely serve these with coffee and for a dessert at a party. Since they are so easy to make, you can make a bunch of them in no time.

And now for the recipe:

Chocolate Truffles (Appetizers, Finger Food, Buffets, and Parties, 2009)

3/4 cup double (heavy) cream
1 egg yolk, beaten
10 oz plain (semisweet) Belgian chocolate, chopped (I used Ghiradelli's)
2 tbsp unsalted (sweet) butter, cut into pieces
2-3 tbsp brandy (optional-I didn't use it)

For the coatings:

(unsweetened) cocoa powder
finely chopped pistachio nuts or hazelnuts
14 oz plain (semisweet), milk, or white chocolate, or a mixture

Bring the cream to the boil, then remove the pan from the heat and beat in the egg yolk. Add the chocolate, then stir until melted and smooth. Stir in the butter and the brandy, if using, then pour into a bowl and leave to cool. Cover and chill in the refrigerator for 6-8 hours.

Line a large baking sheet with baking parchment. Using a very small ice cream scoop or two teaspoons, form the chocolate mixture into 20-30 balls and place on the parchment. Chill if the mixture becomes too soft.

To coat the truffles with cocoa, sift some powder into a small bowl, drop in the truffles, one at a time, and roll to coat well. To coat them with nuts, roll the truffles in finely chopped pistachio nuts or hazelnuts.

To coat with chocolate, freeze the truffles for at least 1 hour. Ina small bowl, melt the plain, milk, or white chocolate over a pan of barely simmering water, stirring until melted and smooth, then leave to cool slightly.

Using a fork, dip the frozen truffles into the cooled chocolate, one at a time, tapping the fork on the edge of the bowl to shake off the excess. Place on a baking sheet lined with baking parchment and chill. If the melted chocolate thickens, reheat until smooth. All the truffles can be stored, well wrapped, in the refrigerator for up to 10 days.


Over all grade: A-

I was very impressed.

Recipe: Chicken with Lemon and Garlic

I was not impressed. I thought it was extremely quick and simple to make, however, I thought the finished product wasn't all that hot. I mean, it was OK, but I didn't go wild over it. It may have also been better had I not substituted some of the ingredients for others (particularly, I put in onion instead of the shallot that it called for). Over all, I think it needs a bit more to it before it is perfected.

Cook grade: A-

There weren't too many ingredients, and the cooking instructions were pretty straight forward. There also wasn't a lot of clean-up. It was very quick and easy. Also, it was very therapeutic during the beating of the chicken to make it thinner. I highly suggest it after a stressful week, haha.

Taste grade: C+

I think the taste was very simple and almost bland. However, I think it has a lot of potential to grow into something better.

I think I would serve this for a small meal. The book suggests serving it as tapas. I would tend to agree.

Here's the recipe:

Chicken with Lemon and Garlic (from Appetizers, Finger Food, Buffets, and Parties, 2009)

8 oz skinless chicken breast fillets
2 tbsp olive oil
1 shallot, finely chopped
4 garlic cloves, finely chopped
1 tsp paprika
juice of 1 lemon
2 tbsp chopped fresh parsley
salt and ground black pepper
fresh flat leaf parsley, to garnish
lemon wedges, to serve

Sandwich the chicken breasts fillets between the two sheets of clear film (plastic wrap) or baking parchment. Bat out with a rolling pin or meat mallet until the fillets are about 1/4 in thick.

Using a sharp knife, cut the chicken into strips about 1/2 in wide.

Heat the oil in a large, heavy frying pan or wok until it is very hot but not smoking. Add the chicken strips, shallot, garlic, and paprika and stir-fry over a high heat for about 3 minutes, until the chicken is lightly browned and cooked through.

Stir in the lemon juice and parsley and season with salt and pepper to taste. Transfer to a warm platter and serve immediately with lemon wedges, garnished with flat leaf parsley.


Over all grade: B

Sunday, October 24, 2010

That Really Burns My Biscuits (Part 2)! Recipe: Abracadabra Hats

Now these were easy to make. Super quick. I liked the taste of them, although I think I liked the Cheesy Bat Biscuits more. The thing I LOVE about these, though, is their flexibility!!! There are SO many options for these. You can make them more pizza-y and put sauce on them. You can put cheese on them. You can put different meats on them. So many different options. That's not to say that the option here is bad...because it's not. This recipe is also really good. It would make a fantastic appetizer at a party. However, it's recipe in which you can't be afraid to expand your horizons.

Pros: Flexibility, taste, easy clean up and easy prep. The pepperoni and salami add a really great taste to the biscuit.

Cons: I couldn't find the salami sticks they referred to here, so I had to buy a large roll (?) of salami, and then cut it when I went to put the hats together.

Like I said before, these would make a great appetizer at a party.

Ok, so here's the recipe:

Abracadabra Hats (from Halloween Food, Fun, and Crafts 2008)

1 package (8 ounces) crescent dinner roll dough
1/2 teaspoon dried basil
16 turkey pepperoni slices
3 to 4 salami sticks, cut into 2-inch pieces
2 cups pizza or marinara sauce

Preheat oven to 375. Separate dough and place individual pieces on work surface. Gently shape each piece into long triangle. Sprinkle triangles evenly with basil. Cut pepperoni slices into crescent shapes using small cookie cutter or knife. (Each slice will make 2 crescents) Place 1 salami stick piece along base of each dough triangle. Partially roll up dough to cover salami and create brim of hat. Place 2 pepperoni crescents on top part of each hat; place on ungreased nonstick baking sheet. Bake 12 minutes or until golden brown at edges. Meanwhile, warm sauce in small saucepan over low heat. Serve hats with warm pizza sauce for dipping.

Makes 8 servings.

If you come across the same problem I did with the salami, just take some salami and cut it into thin, long pieces. That's what I did and it worked out great.

Summary:

Grade: A (because of salami)

Cost: Minimal

Prep: Minimal

Clean up: Minimal

That Really Burns My Biscuits (part 1)! Recipe: Cheesy Bat Biscuits

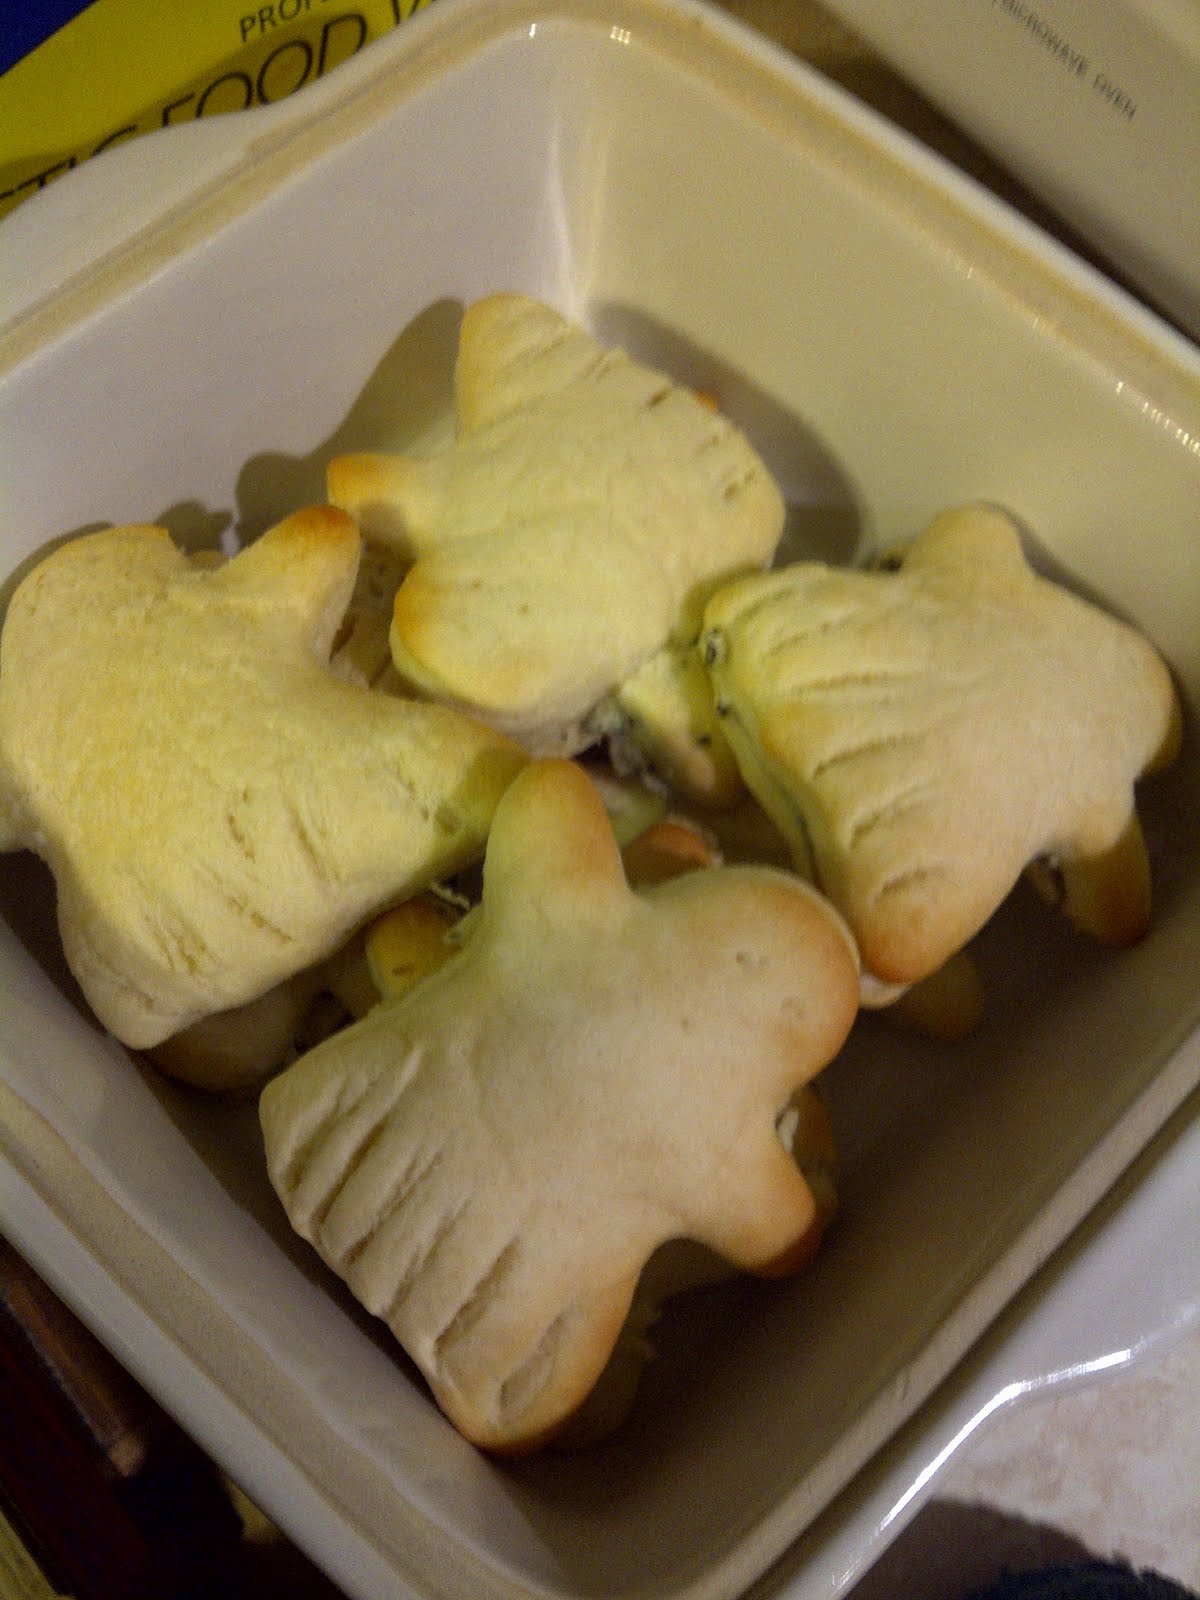
Ok, so they aren't actually bats...they're ghosts, but the outcome (taste-wise) was still the same, I'm sure. I did enjoy these. For how simple they were, I thought they were creative. The taste was different. They were a great substitute or replacement for garlic bread. I found the parsley and basil combination particularly grand. They complemented more than they were overbearing. If you have a pasta dish, these would be fantastic to go on the side.

Pros: Delicious and easy to make. The clean up was easy too. The taste was different (in a really good way!).

Cons: A lot of waste with the biscuits. In fact, I think I threw more dough away than I baked. I really was not happy about that. However, you could get around that by making the entire biscuit (without shaping them with a cookie cutter), or you could reuse the dough. I chose not to, though. I didn't realize I would be throwing so much out.

Things this recipe would be good for? Honestly, it doesn't make that much and you'd be probably spending a lot of time if you made them for a party. I'd say this recipe is great for a family meal. If you have small kids (or you are 5 at heart, like me), the cookie cutter effect is really neat. You could probably double the recipe of you have a large family or want to make it for a guest without too much trouble.

Annnnddddd here's the recipe:

Cheesy Bat Biscuits (from Halloween Food, Fun, and Crafts 2008)

1 can (16 ounces) jumbo buttermilk biscuits
3 tablespoons butter, melted and divided
1/4 cup grated Parmesan cheese
1 teaspoon dried parsley flakes
1 teaspoon dried basil

Preheat oven to 35o. Flatten each biscuit into shape just large enough to fit 3-inch bat cookie cutter. Cut out bat shape; discard scraps. Place biscuits on baking sheet. Lightly score biscuits to outline bat wings; poke holes with toothpick for eyes. Brush biscuits with 1 tablespoon butter. Bake 7 minutes. Meanwhile, combine cheese, remaining 2 tablespoons butter, parsley, and basil in small bowl. Turn biscuits on end and split into halves with forks. Spread 1 teaspoon cheese mixture on bottom half of each biscuit; replace biscuit top. Bake 3 minutes or until biscuits are golden brown.

Makes 8 servings.

That's all!

Grade: A- (because of waste)

Cost: cheap

Prep time: Minimal

Clean up: Minimal

Saturday, September 18, 2010

Recipe: Chocolate Upside-Down Coffeecake

This was tonight's creation. Please excuse the middle of the cake- part of it wound up sticking to the pan and it was a little messy getting it out.

Over all, I think I liked this cake. I have to admit that the jury is still out on the apple jelly on top. I thought it was a little weird with the chocolate. Other than that, though, I liked the cake. Luckily, the apple didn't have a strong taste and the chocolate chips were more prominent.

The upside to this cake was that it was very simple to make and there was easy clean up.

The downside (get it? Upside/downside- it's an upside-down cake...ah, never mind) was the apple jelly. It was just too weird for me to be mixed with chocolate. I had the reservation going into it and I still have it even after tasting it. It won't stop me from trying it again, but still, I thought it was weird. Also, some might think it's a downside that the cake had to cook for about 50 minutes. Other than that, there wasn't a downside. You can always change the jelly to strawberry or raspberry or something if you don't like it.

I would probably serve this at a small get together or party. I wouldn't serve it at a big event.

Ok, so here's the recipe (taken from Hershey's Fabulous Desserts, 1989):

Chocolate Upside-Down Coffeecake

3/4 cup apple jelly (I used more than this- I used however much it took to cover the bottom of the pan)
1 package (16 ounces) pound cake mix
1 cup Hershey's milk chocolate chips, divided into two 1/2 cups

Heat oven to 325. Grease and flour 9 inch square baking pan. Spread jelly evenly onto bottom of prepared pan. Prepare cake batter according to package directions (you'll need water, 1/4 cup butter or margarine, and 2 eggs). Stir in 1/2 cup milk chocolate chips. Pour batter over jelly layer, spreading gently and evenly. Sprinkle remaining 1/2 cup chips over top. Bake 50 to 55 minutes or until cake springs back when touched lightly. Cool 5 minutes in pan; invert onto serving plate. Cool at least 15 minutes; serve warm.

That's all! Stay tuned for the next recipe Strawberry Cordial Cookies!

Recipe: Chocolate Chip 'N Oatmeal Cookies


Last weekend, I decided to make cookies, and I stumbled upon this recipe while looking through the ol' Hershey's cookbook. I was pretty excited, especially since oatmeal and chocolate are my favorite cookie ingredients. I have to say that this recipe was pretty neat since it showed me that cake mixes (yes, cake mixes) can be used for other things than just cakes.


Ok, so the pros to this recipe: They were extremely quick to make and there was little mess/cleanup. They were also really, really good.


Cons to this recipe? It's more of a personal thing to me- I like chewy, gooey cookies. The next day after I baked these, they were crunchy. I wasn't a fan of that, but that's just my own personal preference. Also, the batter turns out extremely gooey when you mix it because of all of the buttter that's required. I wound up having to put the batter in the refrigerator for 20-25 minutes before baking, which wasn't something that was mentioned in the recipe.


I think that's about the rundown of these. I would highly recommend them. They are a fun cookie and the recipe doesn't make too much. The cake mix I felt improved the taste of them over all.


Here's the recipe:


Chocolate Chip 'N Oatmeal Cookies (taken from Hershey's Fabulous Desserts, 1989):


1 package (18.25 or 18.5 ounces) yellow cake mix

1 cup quick-cooking rolled oats (one minute cook quaker oats is what I used)

3/4 cups butter or margarine, softened

2 eggs

1 cup Hershey's Semi-Sweet Chocolate Chips


Heat oven to 350. In large mixer bowl combine cake mix, oats, butter, and eggs; mix well. Stir in chocolate chips. Drop by rounded teaspoonfuls onto ungreased cookie sheet. Bake 10 to 12 minutes or until very lightly browned. Cool slightly; remove from cookie sheet to wire rack. Cool completely.


That's it! Enjoy and stay tuned for the next recipe-Chocolate Upside Down Coffee Cake.

Sunday, September 5, 2010

Recipe: Individual Chocolate Cream Pies

I have to say that so far this recipe has been the most photogenic, hahaha.

So, what do I have to say about this creation? Well, I definitely liked it. Although, I think I enjoyed making it more than eating it (I don't really like graham cracker crust), however, that's not to say that these little guys aren't delicious because they are! The chocolate filling is amazing...light, fluffy, and a perfect dessert after a heavy meal (mom made lasagna for labor day!). A strong cup of coffee is the perfect complement.

The pros to making this are the following: they are extremely fast to make (10-15 minutes max- truly!), no actual cooking (it's just a bunch of blending and whipping), EXTREMELY easy clean-up, and it has the potential for A LOT of variation.

The cons? It's not really a con so much as just something to keep in mind- you have to refrigerate them for a bit before serving so the mousse sets. Otherwise, the filling gets a little runny. Other than that, though, no complaints from me!!

Occasion? If you're truly ambitious, you can prepare these for a small party. Warning though- the recipe only makes 6 at a time, so if you're going to make them for a lot of people, prepare to be by the mixer for awhile. As I stated before, they would be great after a large meal. They also have the potential to be the dessert for a couples dinner. If you garnish them right (strawberries/raspberries on top with whipped cream maybe?) they can be kind of romantic.

And now for the recipe (from Hershey's Fabulous Desserts-1989):

Individual Chocolate Cream Pies

1 1/2 ounces (1/2 of 3-ounce package) cream cheese, softened
6 tablespoons sugar
1/2 teaspoon vanilla extract
2 1/2 tablespoons Hershey's Cocoa
2 1/2 tablespoons milk
1 cup chilled whipping cream (also called heavy cream)
6 (4-ounce package) single serve graham crusts
Whipped Topping (optional)
Hershey's mini chips semi-sweet chocolate (optional)

In small mixer bowl beat cream cheese, sugar and vanilla until well blended. Add cocoa alternately with milk, beating until smooth. In separate bowl beat whipping cream until stiff; fold into chocolate mixture. Spoon into crusts. Cover; chill until set. Garnish with whipped topping and mini chips.


That's everything!

A couple of things I did differently here though: I didn't include the mini chips in my garnish, and instead of using a small bowl to beat the cream cheese, sugar and vanilla, I used a large bowl. It was a little difficult, but it still got the job done. Also, when you buy the cream cheese, they do have 3-ounce cream cheese blocks. They are considerably smaller than the regular rectangle that you get. These are shaped in a square. Just make sure you look at the package to see what you're getting.

Stay tuned for the next recipe- Mint 'n chocolate fudge.